
crumb quilt instructions
Crumb quilting is a delightful technique utilizing small fabric scraps, offering a unique and textured finish. It’s a resourceful method,
perfect for utilizing leftover materials from other sewing projects. This approach allows for creative expression and a charming,
improvisational aesthetic in your quilting endeavors.
The origins of crumb quilting are somewhat obscure, evolving from traditional quilting practices and the desire to minimize waste.
Historically, quilters always sought ways to use every piece of fabric, leading to the development of this scrappy style.
Benefits include significant scrap busting, reducing textile waste and saving money. The resulting quilts boast a distinctive,
organic texture, adding visual interest and a cozy feel to any project. It’s a fantastic way to create something beautiful
from seemingly unusable remnants.
What is Crumb Quilting?
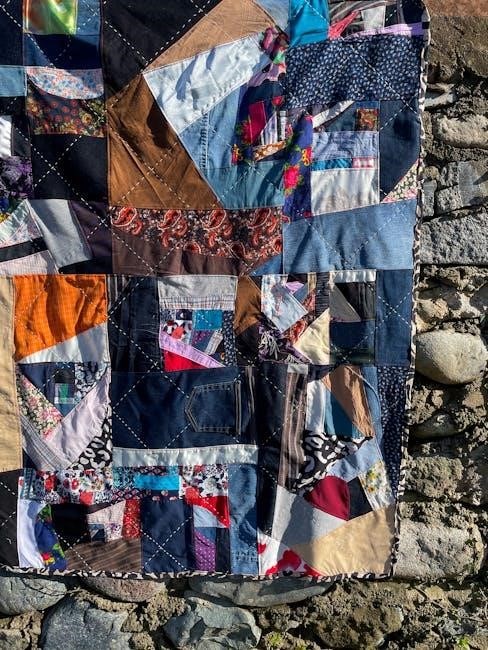
Crumb quilting, at its heart, is a wonderfully freeing and improvisational quilting technique. It involves sewing together tiny, irregularly shaped pieces of fabric – the “crumbs” – to create a unique and textured block. Unlike traditional quilting which often relies on precise cutting and geometric shapes, crumb quilting embraces randomness and celebrates the beauty of scraps.
Imagine taking all those leftover bits from previous projects – the too-small-to-save pieces, the test swatches, the remnants from binding – and transforming them into something entirely new. That’s the essence of crumb quilting! The process typically begins with a foundation fabric, onto which these crumbs are meticulously attached, building up layers of color and pattern.
There aren’t strict rules; the beauty lies in the organic, almost mosaic-like effect. You can aim for a controlled chaos, or let the fabric scraps guide you, creating a truly one-of-a-kind design. The resulting quilt blocks are often surprisingly sturdy, despite their seemingly haphazard construction. It’s a technique that’s both accessible to beginners and endlessly adaptable for experienced quilters seeking a creative challenge.
Essentially, crumb quilting is about resourcefulness, creativity, and embracing imperfection. It’s a testament to the idea that even the smallest pieces can come together to form something beautiful and lasting.
History and Origins of the Technique
Pinpointing the exact origins of crumb quilting proves challenging, as it evolved organically rather than being invented at a specific moment. However, its roots are deeply intertwined with the historical practices of resourceful quilting and a desire to minimize fabric waste; Throughout history, quilters, particularly in times of scarcity, were masters of utilizing every scrap of material.
Early examples of scrappy quilting, resembling crumb quilting, can be found in antique quilts made from remnants of clothing and household textiles. These quilts weren’t necessarily intended as artistic statements, but rather as practical necessities born from economic constraints. The technique gained more recognition in the late 20th and early 21st centuries, as quilters began to intentionally embrace the aesthetic of randomness and texture.
While not formally documented as “crumb quilting” until recently, the underlying principles – using small pieces, improvisational design, and building up layers – have been present in quilting traditions for generations. Modern quilters have popularized the technique, sharing patterns and tutorials, and elevating it to a recognized and celebrated style within the quilting community. It’s a beautiful example of how necessity and creativity can converge to create a lasting art form.
Benefits of Crumb Quilting (Scrap Busting, Unique Texture)
The allure of crumb quilting extends far beyond its charming aesthetic; it offers a wealth of practical and creative benefits. Perhaps the most significant advantage is its exceptional scrap busting potential. Quilters often accumulate a vast collection of leftover fabric from other projects, and crumb quilting provides the perfect outlet for utilizing these remnants, minimizing waste and maximizing resources.
Beyond resourcefulness, crumb quilting delivers a truly unique texture. The irregular shapes and varied fabrics create a delightfully tactile surface, adding depth and visual interest to the quilt. This texture isn’t easily replicated with traditional quilting methods, giving crumb quilts a distinctive, handmade quality.
Furthermore, the improvisational nature of the technique fosters creativity and allows for a relaxed, less structured quilting experience. It’s an excellent project for beginners, as it doesn’t require precise cutting or intricate patterns. The resulting quilt is a testament to resourcefulness, creativity, and the beauty of imperfection, offering a cozy and visually captivating addition to any home.

Materials Needed for Crumb Quilting
Essential supplies include a diverse collection of fabric scraps, suitable backing fabric for stability, and batting to achieve desired loft.
Thread selection is also crucial, considering color and weight for both construction and quilting.
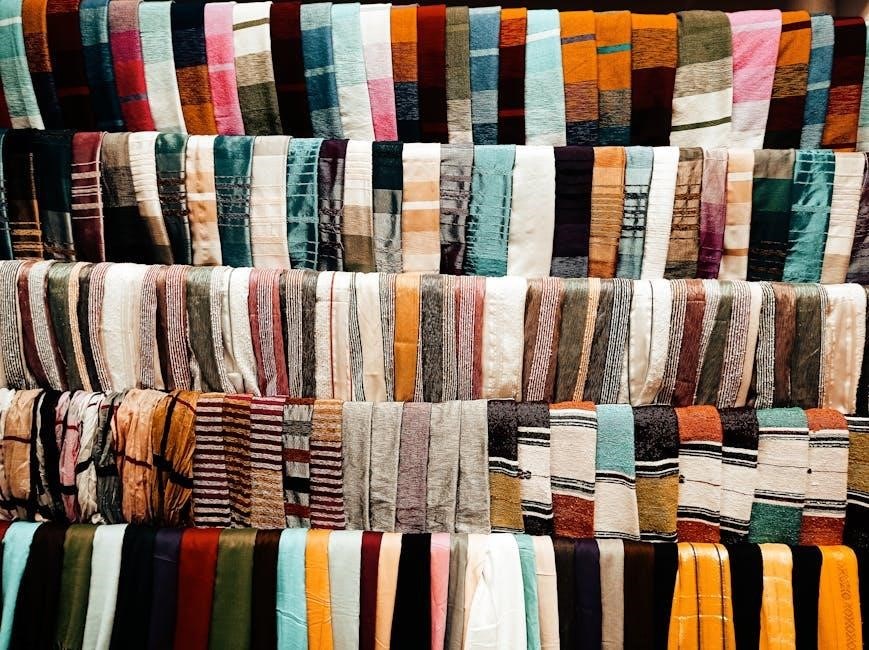
Fabric Scraps – Types and Preparation
Fabric scraps are the heart of crumb quilting, and almost any fabric type can be used! Cotton is a popular choice due to its ease of handling and quilting properties, but don’t hesitate to incorporate linen, silk, or even lightweight denim for added texture and visual interest. The key is variety – different weights, prints, and colors will contribute to the charmingly chaotic aesthetic.
Regarding preparation, scraps don’t need to be perfectly uniform. In fact, the irregularity is part of the charm! However, it’s helpful to trim away any frayed edges or excessively large pieces. Aim for scraps ranging in size from 1 inch squares to approximately 4 inches. Smaller crumbs create a denser, more intricate look, while larger pieces offer quicker coverage.
Pre-washing your scraps is recommended, especially if you’re mixing different fabric types, to prevent shrinkage and color bleeding after the quilt is finished. Ironing isn’t strictly necessary, but it can make handling the scraps easier during the construction process. Sorting your scraps by color or value (light, medium, dark) can be helpful if you’re aiming for a more controlled color palette, though a completely random approach is equally valid!
Don’t discard even the tiniest pieces; they can be used to fill gaps and add extra texture. Embrace the scrappy nature of this technique and enjoy the freedom of using up your fabric stash!
Backing Fabric – Choosing the Right Material
Selecting the right backing fabric is crucial for a successful crumb quilt. The backing provides stability and support for the crumb blocks, so durability and a smooth surface are key considerations. A tightly woven cotton fabric is an excellent choice, offering a good balance of strength and affordability. Muslin can also be used, particularly for smaller projects or if you’re aiming for a more lightweight quilt.
The color or pattern of your backing fabric can subtly influence the overall look of the quilt. A neutral backing, such as white or cream, will allow the crumb blocks to take center stage. Alternatively, a coordinating print or color can add depth and visual interest. Consider the colors and patterns in your crumb scraps when making your selection.
Ensure your backing fabric is at least 4-6 inches larger than your finished quilt top on all sides. This extra fabric allows for quilting and binding without the backing being pulled or strained. Pre-washing the backing fabric is highly recommended to prevent shrinkage after quilting. Ironing the backing before layering will also help to create a smooth, flat surface for your project.
Ultimately, the best backing fabric is one that complements your crumb blocks and provides a solid foundation for your quilt!
Batting – Options for Loft and Texture
Batting significantly impacts the warmth, drape, and overall texture of your crumb quilt. Choosing the right batting depends on your desired outcome and the quilt’s intended use. Cotton batting is a popular choice, offering excellent breathability, a soft hand, and a classic quilted look. It’s ideal for quilts that will be used year-round.
Polyester batting is another common option, known for its affordability, loft, and resistance to shrinkage. It provides a warmer quilt than cotton and is a good choice for colder climates. Blended batting, combining cotton and polyester, offers a balance of both materials’ benefits.
For a more unique texture, consider wool batting. It’s naturally warm, breathable, and adds a beautiful drape to the quilt. However, wool batting can be more expensive and may require special care when washing. The ‘loft’ refers to the batting’s thickness; higher loft means a puffier quilt.
Always ensure your batting is at least 4-6 inches larger than your quilt top on all sides, mirroring the backing fabric requirements. Proper batting selection enhances the beauty and functionality of your crumb quilt!
Thread – Color and Weight Considerations
Thread selection is crucial in crumb quilting, influencing both the aesthetic and structural integrity of your project. A good quality cotton or polyester thread is generally recommended. Cotton thread blends beautifully with cotton fabrics, offering a classic look, while polyester is stronger and more durable, ideal for quilts receiving heavy use.
Regarding color, you have several options. Matching the thread to your fabric scraps creates a subtle, blended effect, allowing the crumb design to take center stage. Conversely, using a contrasting thread color emphasizes the individual crumbs and adds visual interest. A neutral thread, like gray or beige, works well with a wide range of fabrics.
Thread weight refers to its thickness. A 50-weight thread is a versatile all-purpose choice, suitable for most quilting applications. For finer details or delicate fabrics, a 60-weight thread may be preferable. Heavier weight threads, like 40-weight, are best for bold quilting lines or thicker fabrics.
Experimenting with different thread colors and weights can dramatically alter the look of your crumb quilt. Consider the overall aesthetic you’re aiming for and choose accordingly!
The Crumb Quilting Process: Step-by-Step
Begin by creating crumb blocks from fabric scraps, then attach them to your backing fabric. Next, layer with batting for desired loft.
Finally, employ various quilting techniques to secure layers and enhance the texture!
Creating the Crumb Blocks
Embarking on crumb block creation is wonderfully freeing! Start with a foundation fabric – a slightly larger piece than your desired block size. Then, begin adhering small fabric scraps, often irregularly shaped, onto this foundation. Don’t overthink it; the beauty lies in the randomness!
Consider using a light adhesive spray or pins to temporarily hold scraps in place before stitching. Stitching is key – a simple straight stitch around the edges of each crumb is sufficient. Overlap the scraps slightly, building up layers and creating a textured surface. Vary the fabric types and colors for visual interest.
As you add more crumbs, periodically trim the foundation fabric to maintain a manageable size and shape. Don’t strive for perfection; embrace the wonkiness! The goal is a densely filled block with a delightfully uneven surface. Continue adding crumbs until the foundation is completely covered and feels substantial. Pressing the block gently can help settle the layers, but avoid flattening it completely – you want to preserve the texture. Repeat this process to create multiple crumb blocks, varying sizes and colors for a more dynamic quilt.
Remember to have fun and let your creativity flow! There are no strict rules when it comes to crumb quilting; it’s all about embracing the scraps and creating something unique.
Attaching Crumb Blocks to Backing Fabric
Once your crumb blocks are complete, the next step is attaching them to your backing fabric. Lay your backing fabric flat, right side down. Arrange the crumb blocks on top, experimenting with the layout until you achieve a pleasing composition. Consider the overall visual balance and color distribution.
Secure the blocks in place using pins, ensuring they are evenly spaced and firmly attached. You can choose to arrange the blocks in a grid pattern or opt for a more random, organic layout. Once satisfied with the arrangement, begin stitching the crumb blocks to the backing fabric. A straight stitch or a small zig-zag stitch works well for this purpose.
Stitch around the perimeter of each block, ensuring a secure attachment. For a more durable quilt, you can add additional stitching lines across the blocks, further securing them to the backing. Take your time and maintain a consistent stitch length for a neat and professional finish. Pressing the backing fabric gently after stitching can help to flatten the seams and create a smoother surface.
This process forms the foundation of your quilt, preparing it for the next stages of layering and quilting.
Layering with Batting
After attaching the crumb blocks to the backing fabric, it’s time to introduce the batting layer. Carefully lay the batting on top of the backing fabric, ensuring it extends beyond the edges of the crumb blocks on all sides – typically by a few inches. This extra batting allows for ease of quilting and prevents puckering.
Smooth out any wrinkles or creases in the batting, creating a flat and even surface. The batting’s loft will influence the quilt’s warmth and texture, so choose wisely based on your desired outcome. Options range from thin, low-loft batting for a flatter quilt to thicker, high-loft batting for a more plush feel.
Next, gently lay the quilt top (crumb blocks attached to backing) right side up on top of the batting. Again, ensure it extends beyond the batting on all sides. Smooth out any wrinkles, working from the center outwards. This layering process creates the quilt sandwich, ready for the quilting stage.

Basting is crucial at this point. Use safety pins, basting spray, or hand basting stitches to secure all three layers together, preventing shifting during quilting.
Quilting Techniques for Crumb Quilts
Quilting a crumb quilt presents unique considerations due to the varied texture and potential bulkiness of the crumb blocks. Straight-line quilting is a popular choice, offering a modern aesthetic and ease of execution. Use a walking foot on your sewing machine to ensure even fabric feed and prevent puckering.
For a more organic look, consider free-motion quilting. This allows you to create meandering designs that complement the improvisational nature of crumb quilting. Practice on a scrap quilt sandwich first to get comfortable with the technique.
Echo quilting, where you stitch around the crumb shapes, is another effective method; It emphasizes the individual crumbs and adds visual interest. Alternatively, simple stitch-in-the-ditch quilting along the seams between crumb blocks can provide subtle definition.
Remember to quilt through all three layers – quilt top, batting, and backing. Adjust your stitch length and tension as needed to accommodate the thickness of the quilt. Take your time and enjoy the process of bringing your crumb quilt to life!
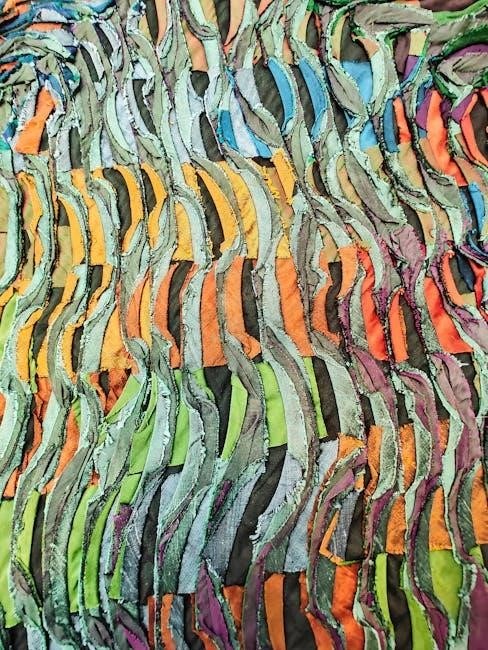
Design Variations and Patterns
Crumb quilts offer immense design flexibility! Random designs embrace spontaneity, while planned variations utilize shapes or motifs for structure.
Incorporate crumb quilting into larger projects like pillows or wall hangings, adding unique texture and charm. Experiment with color placement and crumb size!
Random Crumb Quilts
Random crumb quilts are the epitome of carefree creativity, embracing improvisation and a delightfully unpredictable aesthetic. This approach is perfect for beginners, as it requires minimal planning and allows for a truly organic design to emerge. The beauty lies in the unexpected combinations of fabric scraps, creating a visually textured surface that feels both cozy and unique.
To begin, simply start attaching small fabric pieces – the “crumbs” – to your backing fabric. There’s no need to pre-cut specific shapes or sizes; irregular pieces are encouraged! Overlap the crumbs slightly, varying the direction and orientation of the fabric to avoid a uniform look. Don’t worry about perfection; the charm of a random crumb quilt lies in its imperfections.
As you build up the crumb layer, consider the overall color balance. While a completely random approach is valid, stepping back occasionally to assess the distribution of light and dark fabrics can prevent any one area from becoming too visually heavy. Continue adding crumbs until the entire backing fabric is covered, creating a wonderfully textured foundation for your quilt. The freedom of this method makes it incredibly satisfying and allows your creativity to truly shine.
Remember to secure each crumb with a stitch, ensuring a durable and long-lasting quilt.
Planned Crumb Quilts (Shapes, Motifs)
Planned crumb quilts elevate the technique beyond pure randomness, introducing intentionality through shapes and motifs. This approach requires a bit more forethought, but yields stunning results, allowing you to create specific designs within the crumb structure. It’s a fantastic way to showcase your creativity and add a personalized touch to your quilt.
Begin by sketching your desired shape or motif onto the backing fabric. This could be anything from simple geometric forms to more complex floral patterns or even letters. Then, start attaching crumbs, carefully following the outline of your design. Pre-cutting crumbs into smaller, more manageable pieces can be helpful for intricate details.
Consider using contrasting fabrics to define the shape or motif against the background. Varying the crumb size and direction can also add depth and visual interest. Don’t be afraid to experiment with different fabric combinations to achieve the desired effect. The key is to maintain a balance between the planned design and the inherent texture of the crumb quilting technique.
This method allows for incredible customization and the creation of truly unique and meaningful quilts.
Using Crumb Quilts in Larger Projects (Pillows, Wall Hangings)
Crumb quilts aren’t limited to full-sized quilts; their unique texture and scrappy charm make them ideal for smaller projects like pillows and wall hangings. Utilizing crumb quilting in these applications adds a handcrafted, cozy element to your home décor. The smaller scale also makes them a quicker and more manageable undertaking for beginners.
For pillows, create a crumb quilt panel slightly larger than your desired pillow size. Once quilted, trim to the correct dimensions and sew onto a pillow back, adding a zipper or envelope closure. The textured surface of the crumb quilt adds visual interest and a tactile quality to the pillow.
Wall hangings offer another excellent opportunity to showcase crumb quilting; Consider framing a crumb quilt panel or incorporating it into a larger mixed-media piece. Experiment with different shapes and sizes to create a visually appealing composition. Adding embellishments like buttons or embroidery can further enhance the design.
These smaller projects are a fantastic way to practice the technique and explore different design possibilities before tackling a larger quilt.
Finishing Your Crumb Quilt
Binding secures the edges, offering machine or hand-sewn options for a polished look. Gentle washing preserves the quilt’s texture and vibrancy.
Proper care ensures longevity, maintaining its beauty for years to come.
Binding Options (Machine or Hand Binding)
Binding is the crucial final step, neatly encasing the raw edges of your crumb quilt and providing durability. You have two primary methods: machine binding and hand binding, each offering a distinct aesthetic and level of effort.
Machine binding is faster and ideal for a more contemporary finish. Begin by joining strips of binding fabric to create a continuous length. Attach the binding to the quilt’s front, using a ¼ inch seam allowance. Fold the binding over to the back, carefully mitering the corners for a clean look, and stitch in place from the front. This method is efficient and creates a secure, professional edge.
Hand binding, while more time-consuming, yields a beautifully refined and heirloom-quality finish. After attaching the binding to the front as with machine binding, turn it to the back and slip-stitch it invisibly into place. This technique requires patience and a neat hand, but the result is a subtle, elegant edge that complements the texture of the crumb quilt. Consider using a contrasting thread color for a decorative touch, or a matching thread for a more understated look. The choice depends on your preference and the overall style of your quilt.
Regardless of the method chosen, pressing the binding as you go is essential for a crisp, professional finish. Take your time and enjoy the satisfying completion of your crumb quilt!
Washing and Caring for Your Crumb Quilt
Proper washing and care are essential to maintain the beauty and longevity of your lovingly crafted crumb quilt. Due to the numerous fabric scraps used, gentle handling is key. Before the first wash, it’s advisable to lightly hand wash the quilt to remove any sizing or manufacturing residue.
For subsequent cleaning, machine washing is generally acceptable, but use a cold, delicate cycle with a mild detergent. Avoid harsh chemicals or bleach, as these can damage the fabrics and fade colors. A color catcher sheet is recommended to prevent dye transfer between scraps. Tumble dry on low heat or, ideally, line dry to prevent shrinkage and maintain the quilt’s shape.
Avoid excessive washing, as this can weaken the fibers and loosen the crumb pieces. Spot clean minor stains whenever possible. Regular fluffing and shaking will help maintain the quilt’s loft and texture. Store your crumb quilt in a breathable cotton bag when not in use, protecting it from dust and sunlight. With proper care, your crumb quilt will become a cherished heirloom, offering warmth and comfort for years to come.
Remember, the unique nature of crumb quilting means some minor fraying or shifting of crumbs is normal and adds to its charm!